
So, I have just finished setting up WordPress for this very website you are viewing, and I thought I’d write a post about it to serve as a quick reference and guide for those looking to set up their first website or blog using the world’s most powerful content management system: WordPress.
I will try to keep things very simple and explain every step with detailed instructions and images. So even if you are a total beginner who has never set up a WordPress site before, you should be able to follow along and complete the process in a matter of minutes (if everything goes smoothly).
This guide assumes your web hosting service uses cPanel, which is the most popular web hosting control panel and the one currently utilized by our web hosting provider. If you are using a different control panel, that’s fine, most of the steps below apply to any control panel out there (with some slight differences).
Note: A lot of web hosts nowadays offer a 1-click WordPress installation feature that automatically installs the system on your chosen domain name, but we’re not interested in that here. I’m going to show you how to install it manually just like most experienced webmasters and professionals do. This is going to be a relatively easy and quick task.
Let’s set the ball rolling!
Step 1: Download WordPress From The Official Website
The first thing you need to do is download the latest release of WordPress from its official website only. You will find a downloadable zipped archive (a .zip file) that contains all of the WP system files that you need to upload to your server (see step 4).
Step 2: Log in to cPanel
Use the login details provided by your web hosting company to access your cPanel account. This user-friendly control panel has several useful tools that make managing your website an easy task.

We will only be using two of the many cPanel tools for the purpose of this guide: The File Manager and the MySQL Database Wizard tool. These make it possible to quickly manage your server’s files and databases right from your web browser without the need to use any third-party software.
Important: Check the “SSL/TLS Status” tool in cPanel to make sure that an SSL certificate is installed and active for your domain. An SSL certificate enables your website to use secure connections that start with “https” instead of “http”. This is important because insecure pages can rank lower in search engines. Fortunately, the majority of web hosts offer a free SSL certificate, so make sure it is installed and properly working before you continue.
Step 3: Create a New MySQL Database
WordPress uses a MySQL (or MariaDB) database to store all of the site’s data (posts, comments, user accounts, site settings, and so on). You can find the recommended MySQL version for the current release of WP on the download page of the official website.
Your hosting plan should include at least one MySQL database, which is all you need to run WordPress. Follow these instructions to create a new database and assign a user to it in cPanel.
Open the MySQL Database Wizard
From the cPanel main page, locate the “MySQL Database Wizard” tool under the “Databases” tab and click on it. It will then ask you to provide essential details for your new database, which we will explain below.
Enter a name for the database:
The first thing you’ll be asked to provide is a name for the new database. This can be any name of your choosing, such as “blog”, “site”, etc. You’ll notice that there is a mandatory prefix (normally your cPanel username followed by an underscore) for the database name that appears before the value you fill in. The full database name consists of both the preset prefix and the name you provide, for example “cpusername_dbname”.

Click “Next Step”.
Now you will be asked to create a new user for your database. Fill in the username and password you’d like to use. Also notice here that the username has the same prefix as the database name. The given prefix is part of the full username you’ll need to access the database.

At this point, make sure you have written down the database name (including the prefix), the database username (also with the prefix), and the password. You can save these in a temporary text file because you’ll need them in a little bit.
Click “Create User”.
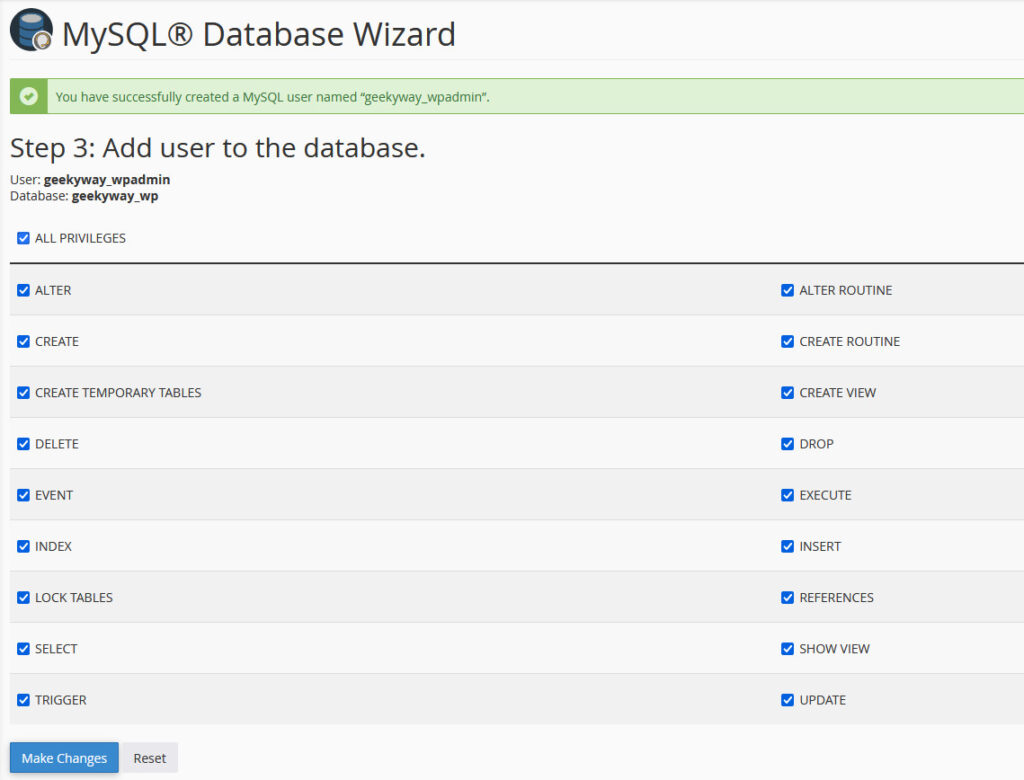
Next, you’ll have to assign the user to the database you’ve just created and grant it privileges. Normally, you’d want to check the box at the top that says “All Privileges”, and then click “Make Changes” or “Next Step”.
That should be all for the database creation part. You can go back to the homepage of your cPanel account now.
Tip: Shared hosting services usually have tight limits on the maximum size of databases, database tables, and concurrent connections. These are usually not an issue for a new and small website, but if you are building a sizeable website, you should pay attention to such limits to avoid trouble and frustration down the road.
Step 4: Upload WordPress Files to Your Server
There are different ways to upload the WordPress files to your server. Some tutorials advise to use an external FTP client, which can cause a lot of unnecessary hassle. We’re going to do it the easier and faster way using the web-based file manager in cPanel.
But first let’s do a simple trick that will save you a lot of time. We are going to upload all of WP files as one zipped file and then unzip it on the server. This makes the upload process much faster.
Remember the zipped WordPress file you downloaded from the official website (step 1)? You’re gonna have to modify it a little bit because it unzips all of the contents into a new folder, and we don’t want that — but we’ll fix it…
Unzip the file (it should be named “wordpress-[version].zip”) on your PC and wait until it’s completed decompressed. This will create a new folder named “wordpress” with all of the system’s files and folders inside.
Open the unzipped “wordpress” folder and select all of its contents (all files and folders it contains). Place the mouse cursor anywhere over the selected items, click the right mouse button, select “Send to” then “Compressed (zipped) folder”, and wait for the compressing process to complete.

Once done, take the newly created .zip file and move it to the “Downloads” folder (not necessary but makes it easier to locate when uploading). For reference purposes, let’s rename this file to “wp.zip”.
Now, back to the cPanel homepage, click on “File Manager” under the “Files” tab. Locate the “public_html” folder and open it. This is the root directory of your website where all of its files are located. If you intend to install WordPress on an add-on domain rather than your account’s main domain, then look for the folder with the corresponding name inside the “public_html” folder and open it.

Tip: If you find a file named “index.html” or “index.php” inside, delete it before you proceed. To delete a file, right-click on it and choose “delete”.
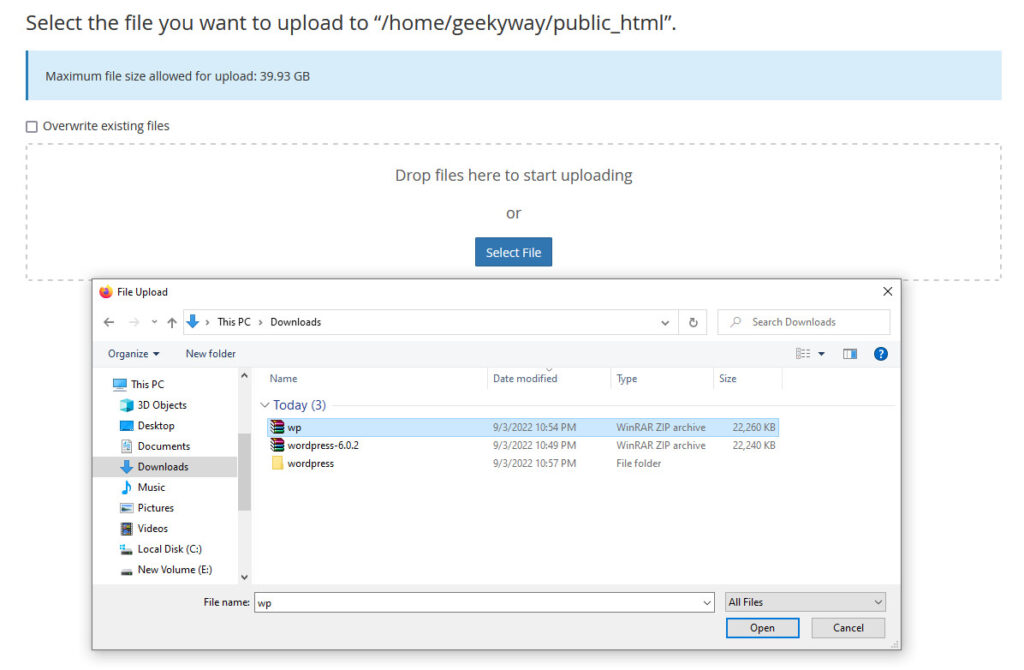
Now, from the top menu, click on “Upload”. This will open the file upload page. Make sure again that you are uploading to the “public_html” folder (or the correct add-on domain folder) by checking the path displayed at the top of the page.
Click “Select File” and select the zipped WordPress file you created on your PC earlier (we named this one wp.zip and moved it to the Downloads folder).
Wait for the upload process to complete and the progress bar to change color from blue to green. Don’t close or leave the page until the bar turns green even if it says “100% complete”.

After the upload has completed and the progress bar has turned green, click “Go Back to …” to return to the “public_html” folder.

You should now see the wp.zip file inside the “public_html” folder, if not, click “Reload” from the menu at the top.
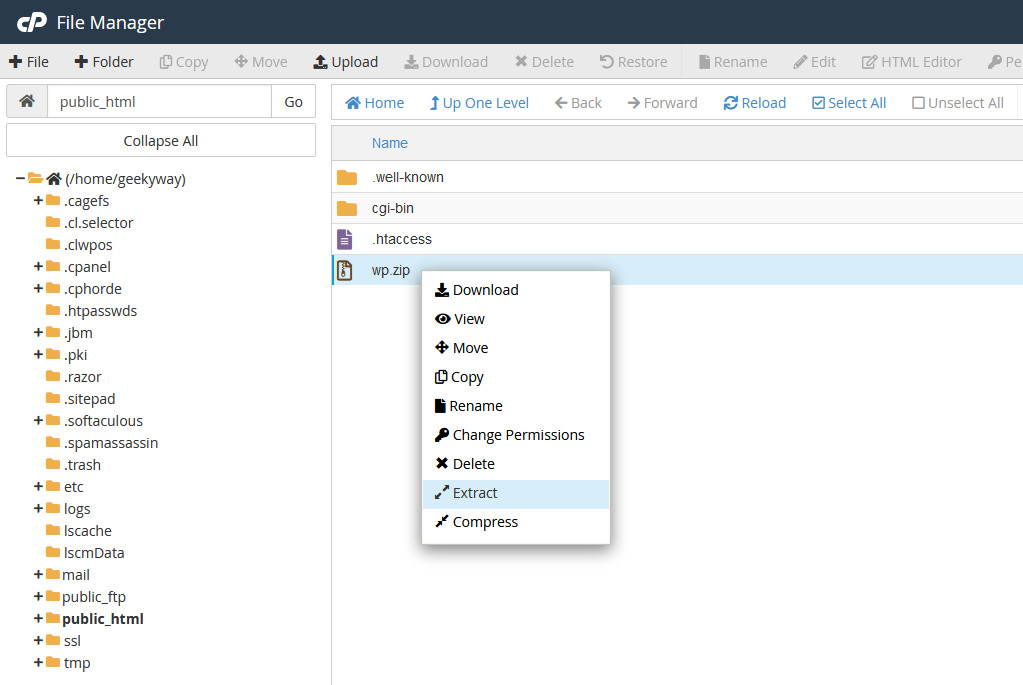
Right-click on the wp.zip file and choose “Extract” then “Extract Files”. Wait for the extraction (unzipping) process to finish.

Note: If you would like to install WordPress on a subdirectory instead of the root/main directory of your website (e.g. mydomain.com/blog/), you have to add this subdirectory to the path field after you click “Extract” and before you click “Extract Files”.
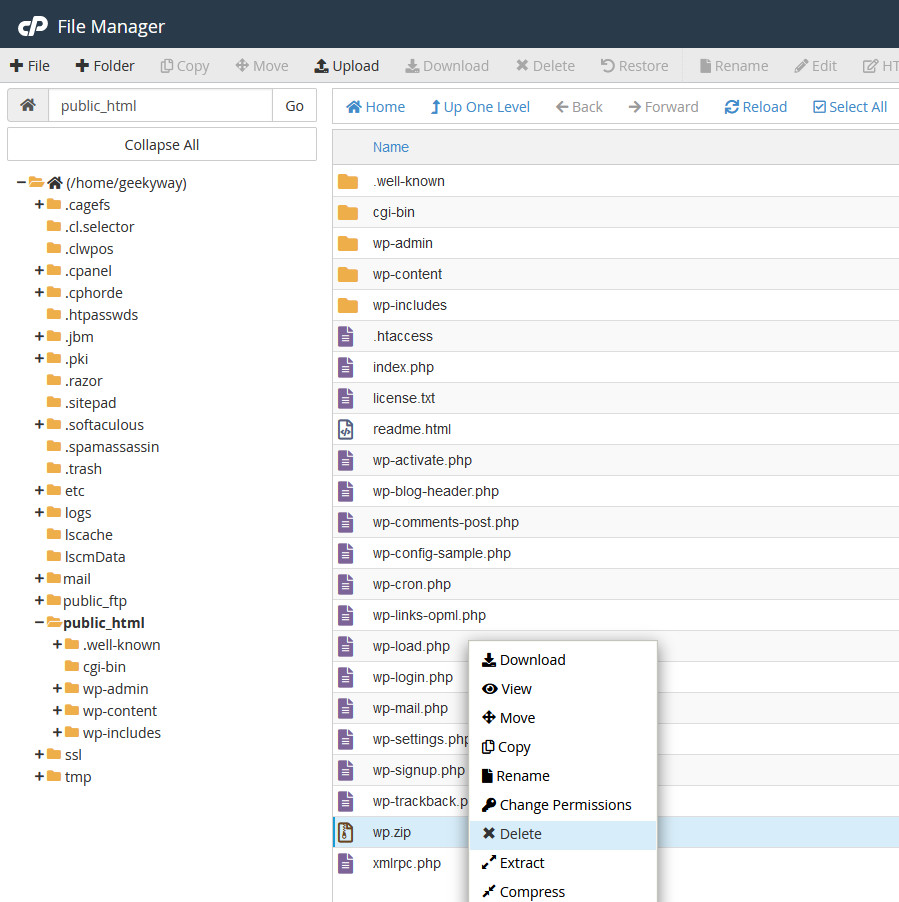
You should then see all of the WordPress system files and folders in the directory where you extracted them to (the public_html directory in our case). If not, click “Reload” from the top menu.
One last important thing you should not forget to do is to delete the zipped WordPress file (wp.zip) after you have successfully unzipped its contents on your server. Right-click on it and choose “delete”. If given the option, choose to skip the trash and permanently delete the file.
We’re done with the file manager for now. Close it and let’s get the installation started — finally!
Step 5: Initiate The Installation Process
There is an optional step where you create a “wp-config.php” file that contains your database details, but we are going to skip this step because the installer script will automatically create this file for you during the installation process, which we’re about to get started.
Using your web browser, open your website’s URL where you uploaded the WordPress files. This should be the root directory of your website (e.g. https://yourdomain.com). In case you uploaded the files to a subdirectory on your server (e.g. /blog), then visit the corresponding URL (e.g. https://yourdomain.com/blog/). Make sure to use a secure URL that starts with “https”.
WordPress will automatically detect that this is a new installation and will initiate the process for you.
The first page will ask you to select the language you’d like to use. The default selection is “English (United States)”. You can either keep it or select another language from the list and then click “Continue”.

On the next page you will see a reminder of the information you’ll need to complete the installation process. Make sure you have the database details (from step 3) at hand and click “Let’s go!”
You will then be asked to fill in the database name, database username, password, host, and table prefix.
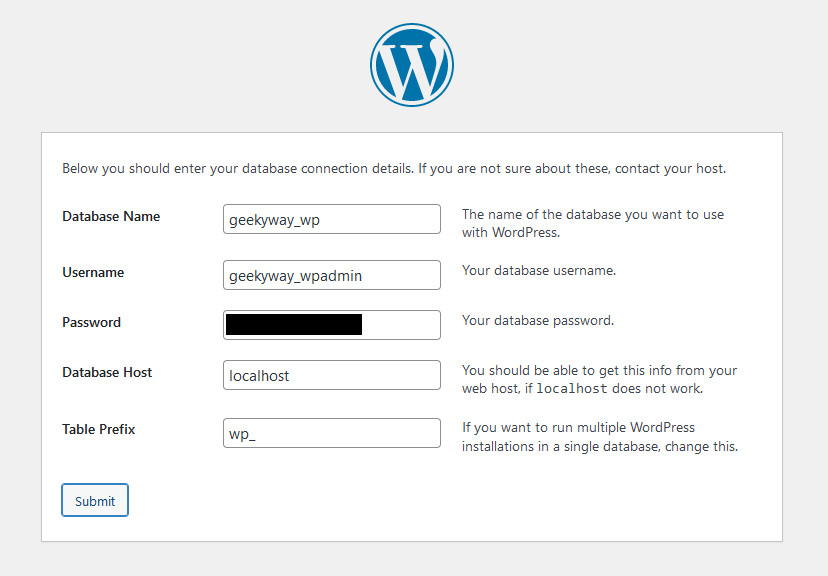
The database host will most likely be localhost unless in the rare case that your hosting provider uses custom database hosts, in which case they should have provided you with this information in the initial account setup email they sent you.
As for the table prefix, you can leave the default value (wp_) unless you intend to have multiple WP installations in the same database, in which case you have to use a unique prefix for each installation (e.g. wp1_, wpstore_, etc.)
Click “Submit”, then “Run the installation”.
The last stop of this rather short installation journey will require you to provide some basic details for your new WordPress website. Fill in a title for your website, an administrator username, password and email address. You will also have the option to exclude your site from search engines (via a “noindex” robots meta tag), but you most likely don’t want to check this option.
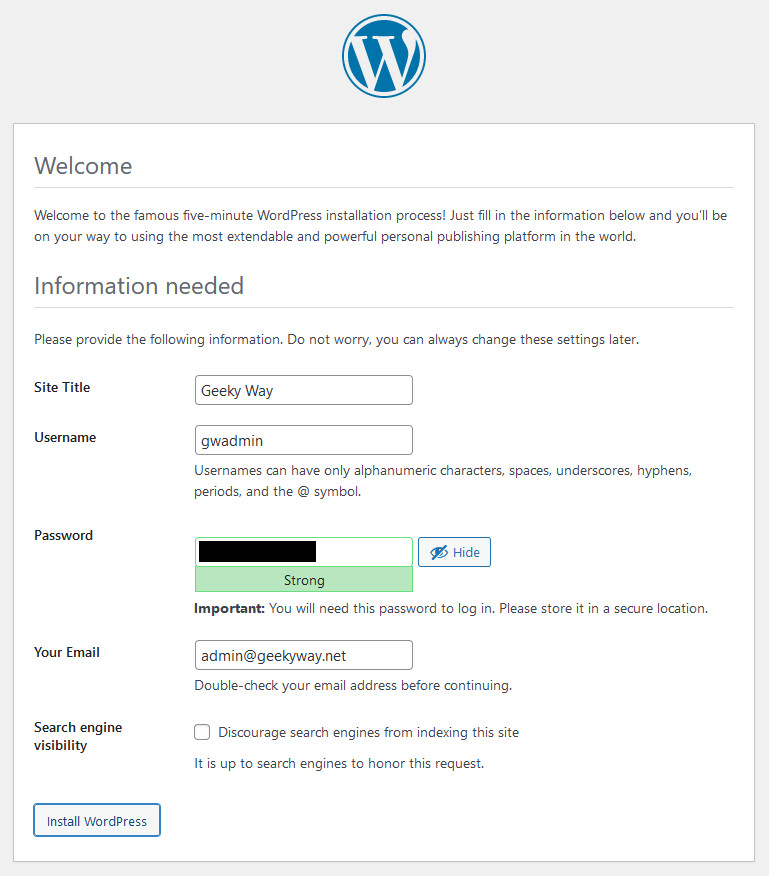
Note: All of these information, except for the admin username, can be changed later. You can change the admin’s display name (the nickname displayed on the site’s pages) at any time but not the username itself.
Make sure you have stored the username and password in a safe place and then click “Install WordPress”. Wait a few seconds and you should get a “Success” message and a link to log in to your newly installed WP site.
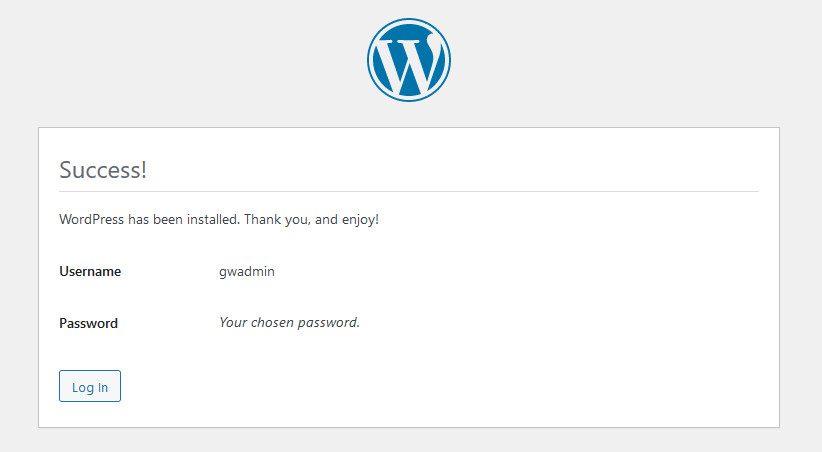
That’s all, you’ve done it! Next, we’ll do some basic customization.
Step 6: Customize Your Fresh WP Website
Log in to your WordPress administrator dashboard using the username and password you chose in the previous step.
Tip: If you lost the link to the login page, you can access it by simply adding “/wp-login.php” or “/wp-admin” to the end of your site’s homepage URL, e.g. “https://mysite.com/wp-login.php”.
After you log in, you will be redirected to the admin dashboard from where you will be able to control and modify every aspect of your website. The sidebar at the left side of the dashboard screen is where you can find various menus for accessing different sections and configuration pages of the admin area.
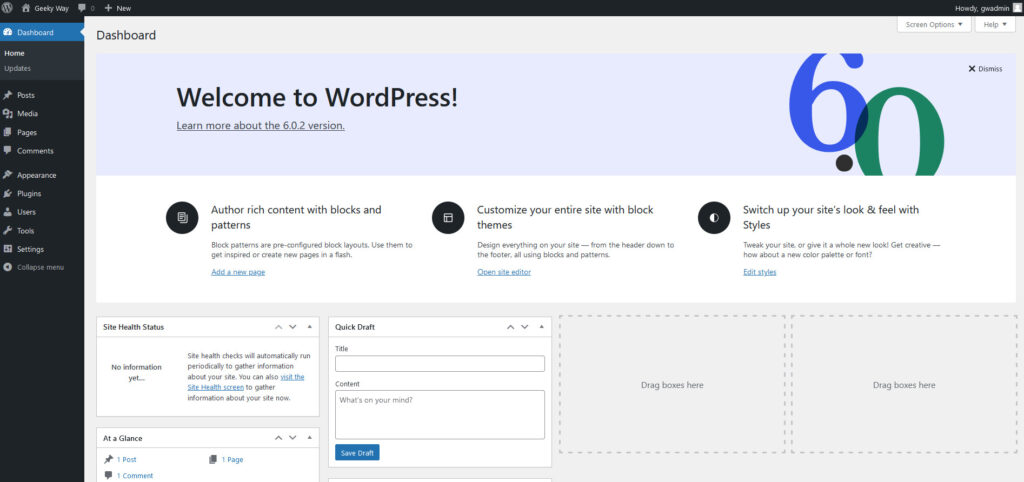
Hover your mouse cursor over the “Settings” button located at the bottom of the sidebar, then click on “General” from the menu that appears next to it. This will take you to the General Settings page from where you can modify some basic settings of your site; such as the title, tagline (subtitle), language, time, etc.
Feel free to explore other settings pages from the menu to change any of the default settings to your preferred options.
You probably have one or more themes in mind that you’d like to install and try out. You can view the available themes for your site and add/activate new ones by selecting “Appearance” from the left sidebar and then “Themes”.
Plugins are also an essential part of every WP site, and you can view and manage these by clicking on “Plugins” from the sidebar. Among the first plugins you’ll most likely need is one that enables you to create a contact form for your site. Recommended: check out the free Contact Form by WPForms plugin.
It’s gonna take some time and plenty of trial and error for a beginner to figure out the right theme and plugins and the optimal settings for their website. Fortunately, WordPress is the most comprehensively documented and supported content management system, so whenever you get stuck at something, help can come almost instantly; just go search or ask for it.